Counter-Attack
On 26 June, 1944, 6th Battalion Royal Scots Fusiliers, 44th (Lowland) Infantry Brigade, 15th Infantry Division were tasked with hitting the Town of Saint-Manvieu-Norrey with support from the Churchill Tanks of 9th Royal Tank Regiment. The goal for this was either to push S.S.-Panzerregiment 26, 12. S.S. Panzer-Division Hitlerjugend out of the town, or to encircle and capture or destroy them. This was largely achieved, not without high losses on both sides. The fighting was often fierce and brutally close - many skirmishes would boil down to hand-to-hand combat, fighting for houses or even room-to-room. The German defenders were well emplaced, meaning the British had to try and flush them out using Flamethrower Tanks. By the afternoon of this day, the Town had mostly been cleared of 12. S.S., however, their Divisional H.Q. had been encircled and cut-off. Because of this, 21. Panzer-Division were ordered to Counter-Attack the Town from the Farmlands way off to the East. As such, 6th R.S.F. had weathered the attack, not before Batteries of the 181st Field Regiment (15th Infantry Division) had put a hold to that advance with their Artillery.
Preparing The Game
Given the limitations of the Flames of War rules, we tried to re-create this battle whilst being able to both play the game and still have fun. Normally the game boils down to two Armies smashing into one another and I personally find it a little boring. Having a bit of a narrative behind the game and loosely basing it on Historical events makes the battle a little more interesting and can bring the game to life. This was exactly what happened. Greg had picked a Mission for us to play and decided on doing a 150 point D-Day Beach Defence list with Panzers in support, which was what gave me the idea in the first place. With this, I picked a 150 point Rifle Company list with trimmings and Churchill Tanks to support them. Next was setting up the Battlefield on tabletop.
 |
The Mission.
|
 |
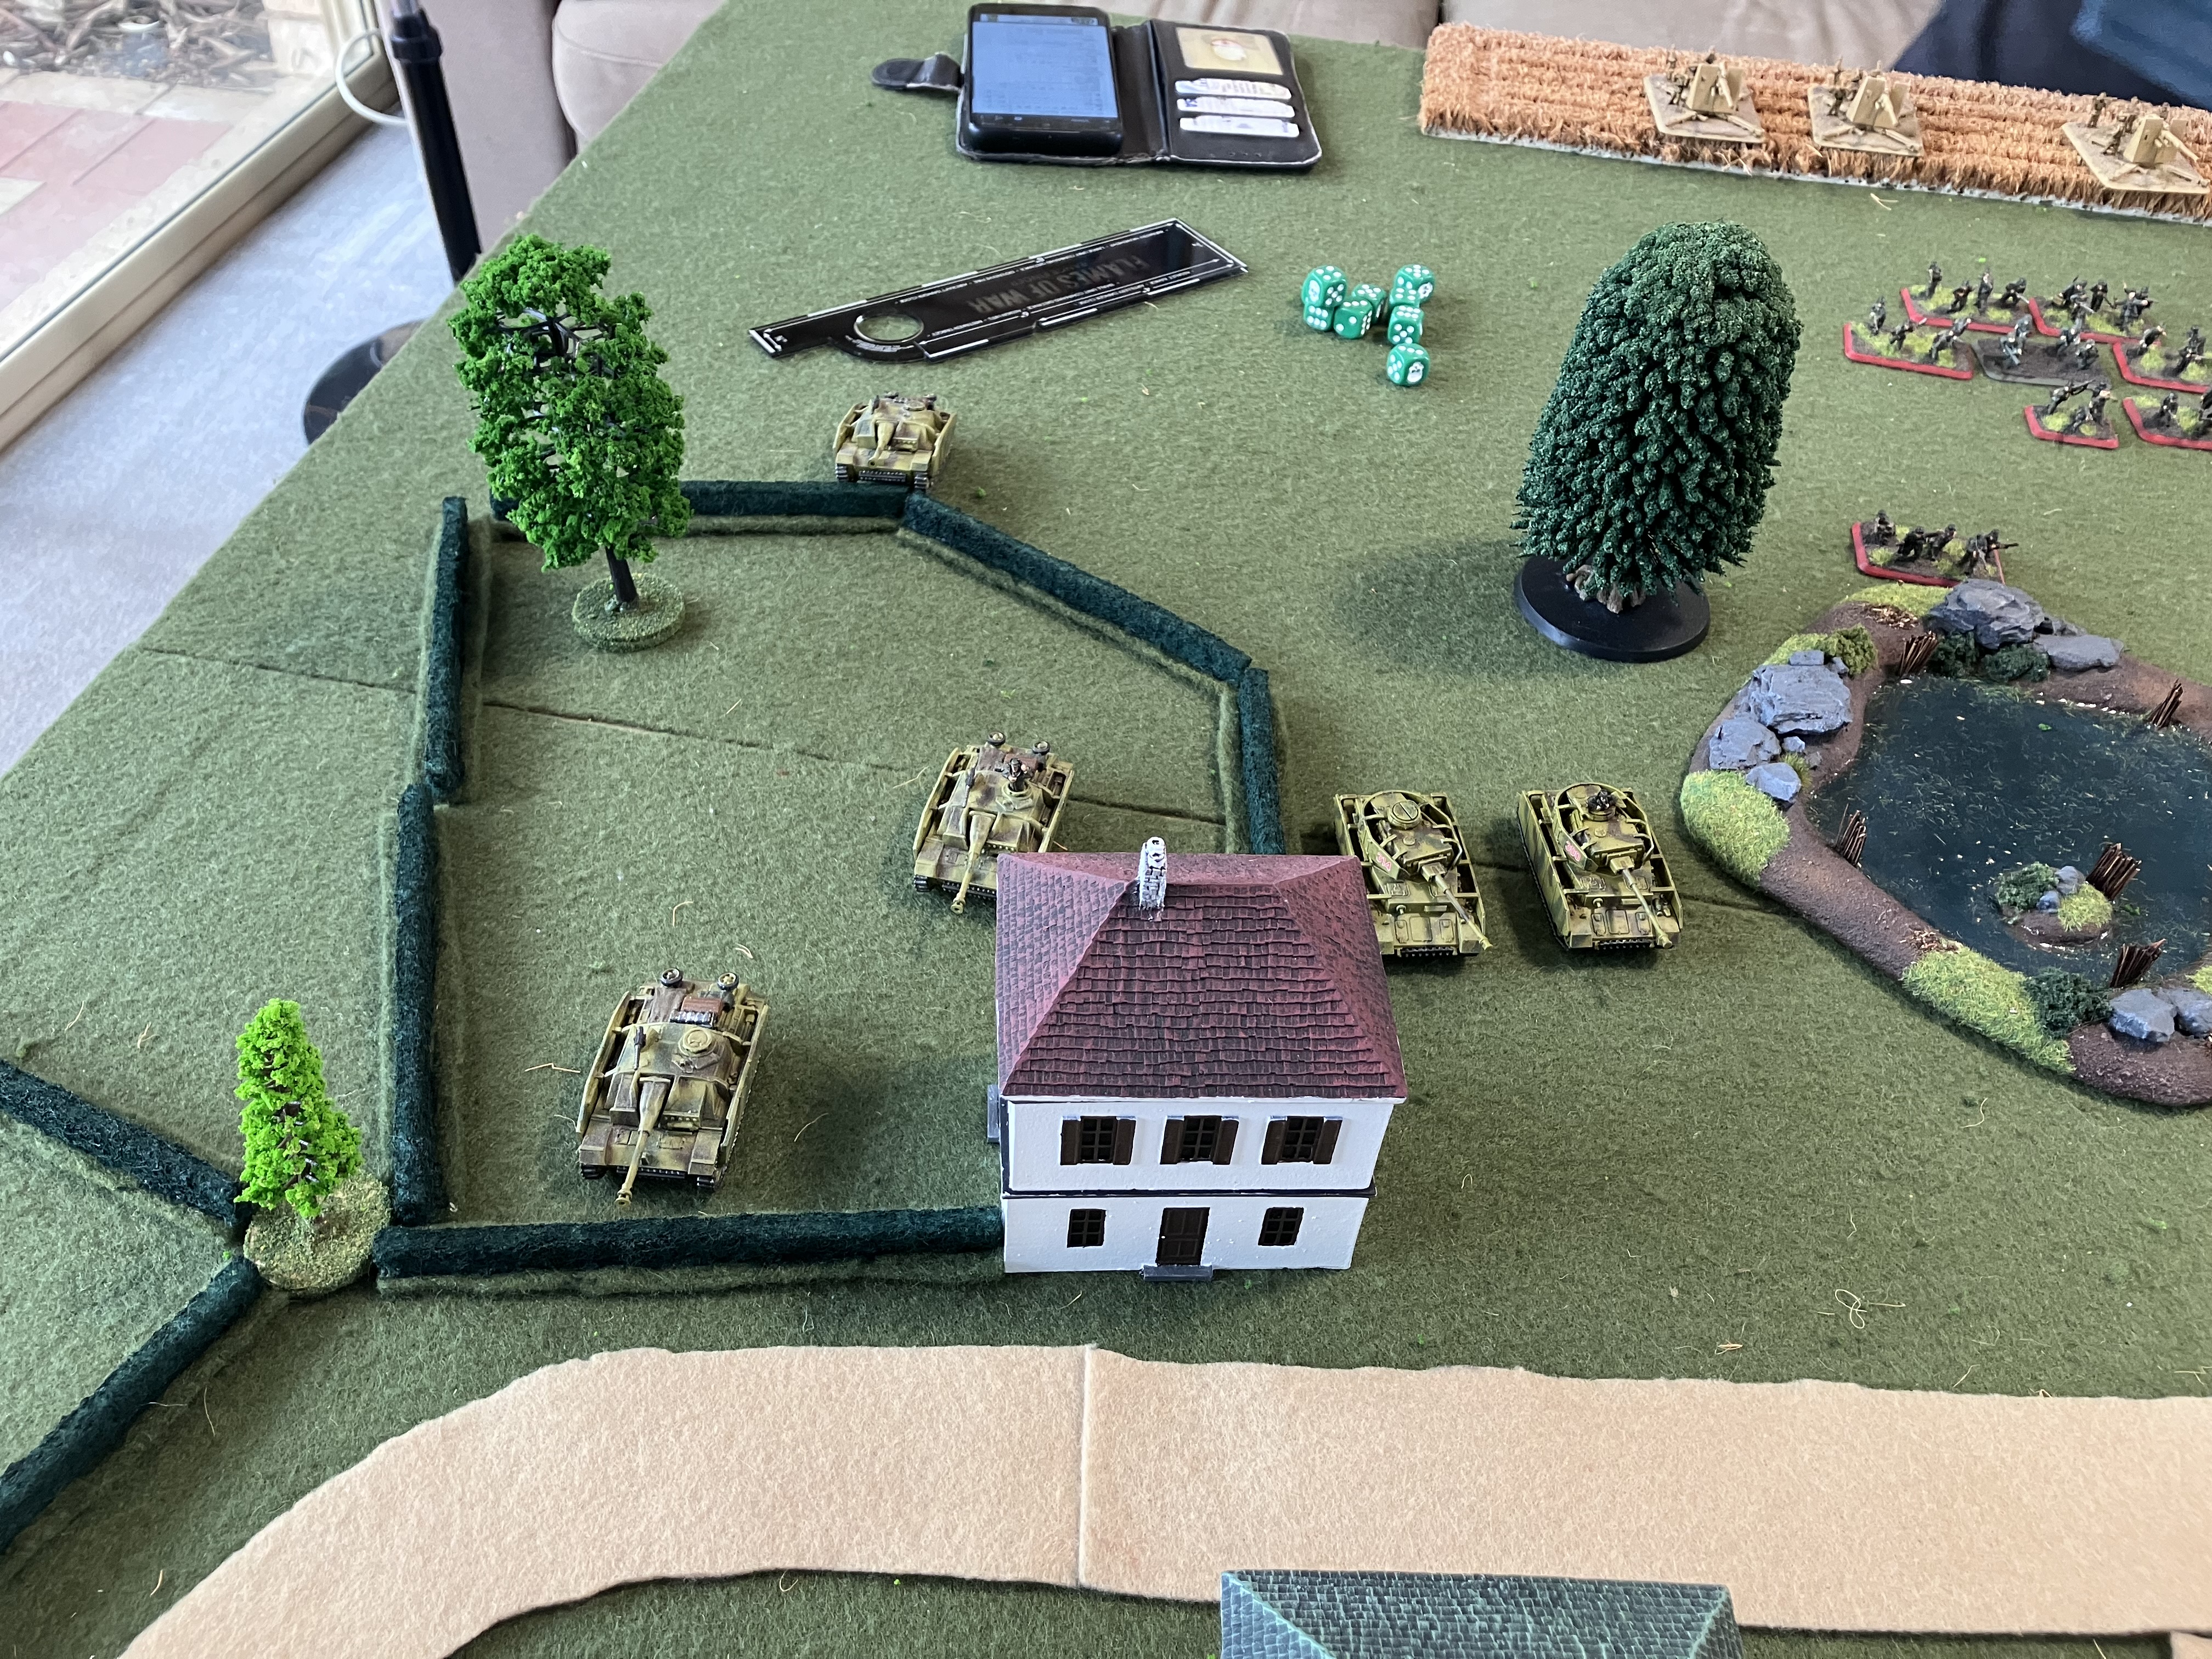
Birds-eye view of the Battlefield.
|
The two Objectives for this Battle are the destoryed Tiger Tank in the muddy field and a destoryed Daimler Armoured Car inside the Town itself. With that set up, the Battle was now to commence.
The Battle
The British Troops were ordered to Dig-In and hold the edge of Town at all costs, weather anything the Germans throw at them and await the arrival of their Churchill Tanks to hit back at the German Panzers and drive them off the Town. Despite casualties sustained through the day's fighting, it was a tall order, but one that must be met.
As for the Germans, it couldn't be any more simple. Smash a hole in the British lines and then exploit the gap to move in and relieve the encircled 12. S.S. Division.
 |
German Panzers with Infantry and 88's prepare to attack.
|
 |
More Infantry with support weapons in the Wheat Fields.
|
 |
Tigers on the extreme Flank with support from Sd Kfz 10/4 Light AA trucks.
|
 |
6th Battalion Royal Scots Fusiliers Dug-In around town with support weapons alongside.
|
As such, the British Infantry are now entrenched into Foxholes and Slit-Trenches alike. They check their rations, supplies and ammunition. Correct firing lines and nervously await what the Germans will throw at them. They highly anticipate that the Tiger Tanks will come from the North of their position, leaving a gap in the middle to spring an Ambush with their heavy 17 Pound Guns. On the far right, two lighter 6 Pound Guns watch the extreme flank towards the Wooded areas, where they believed the quicker, smaller Panzers would appear from. In the very center at the rear, two Vickers MMG's are set up inside a house to cover the rear, should anything go a bit pear shaped.
 |
Panzers and Infantry push-off and begin their attack.
|
 |
Support weapons using the Wheat Fields for cover.
|
 |
Tigers cross the road and swing around the Woods.
|
Engines fire up. Smoke plumes and petrol fumes fill the air as the Tanks and Trucks begin to move off their starting line. They try to race ahead of the Infantry to get into good positions to give good fire support to allow the Troops to move up unopposed. Slowly, the Infantry trudge up through the vast Green Fields of Normandy, as the Machine Gun and Infantry Gun teams move through the Wheat Fields. The air is warm and sticky, not particularly pleasant for the Support Teams carrying heavy equipment. But the men are eager to get stuck in all the same.
Hearing the distant roar of metal beasts roll towards them. The clunking and clanging of gears shifting and tracks grinding, the British sit tight and watch the horizon. Soon dark figures and shadows begin to appear and they carefully sight their weapons, trained to the center of mass as the Germans advance. Nerves of steel are required, as they are trained not to fire too soon and give away positions.
 |
6 Pound Guns sight the German Tigers.
|
 |
17 Pound Guns spring their Ambush.
|
Suddenly, loud pops and cracks sound out from the center of Town. The 17 Pound Guns appear from under cover and take long-range shots at the numerous advancing Panzer Tanks, sending high velocity shells across the open field. British Officers had gotten the direction of advance wrong. Now the heavy guns were facing off against numerous Tanks coming towards them. Their Armour is no match for the penetrating power of the 17 Pound AP shell, however. This means that the 6 Pound Guns are left to deal with the heavy Armour of the Tiger Tanks on the far flank.. A difficult task indeed..
 |
Successful Smoke Barrage.
|
This certainly shook the German Commanders up. Knowing too well the devastating effect of the 17 Pound Gun, they quickly call in a Smoke Barrage along the main road, blinding the Guns and any Infantry dug-in along the run of the road. Behind this, the German Armour is able to advance at speed to close down the distance between themselves and the Guns. The Infantry now begin to pick up the pace to try and keep up with the Tanks.
 |
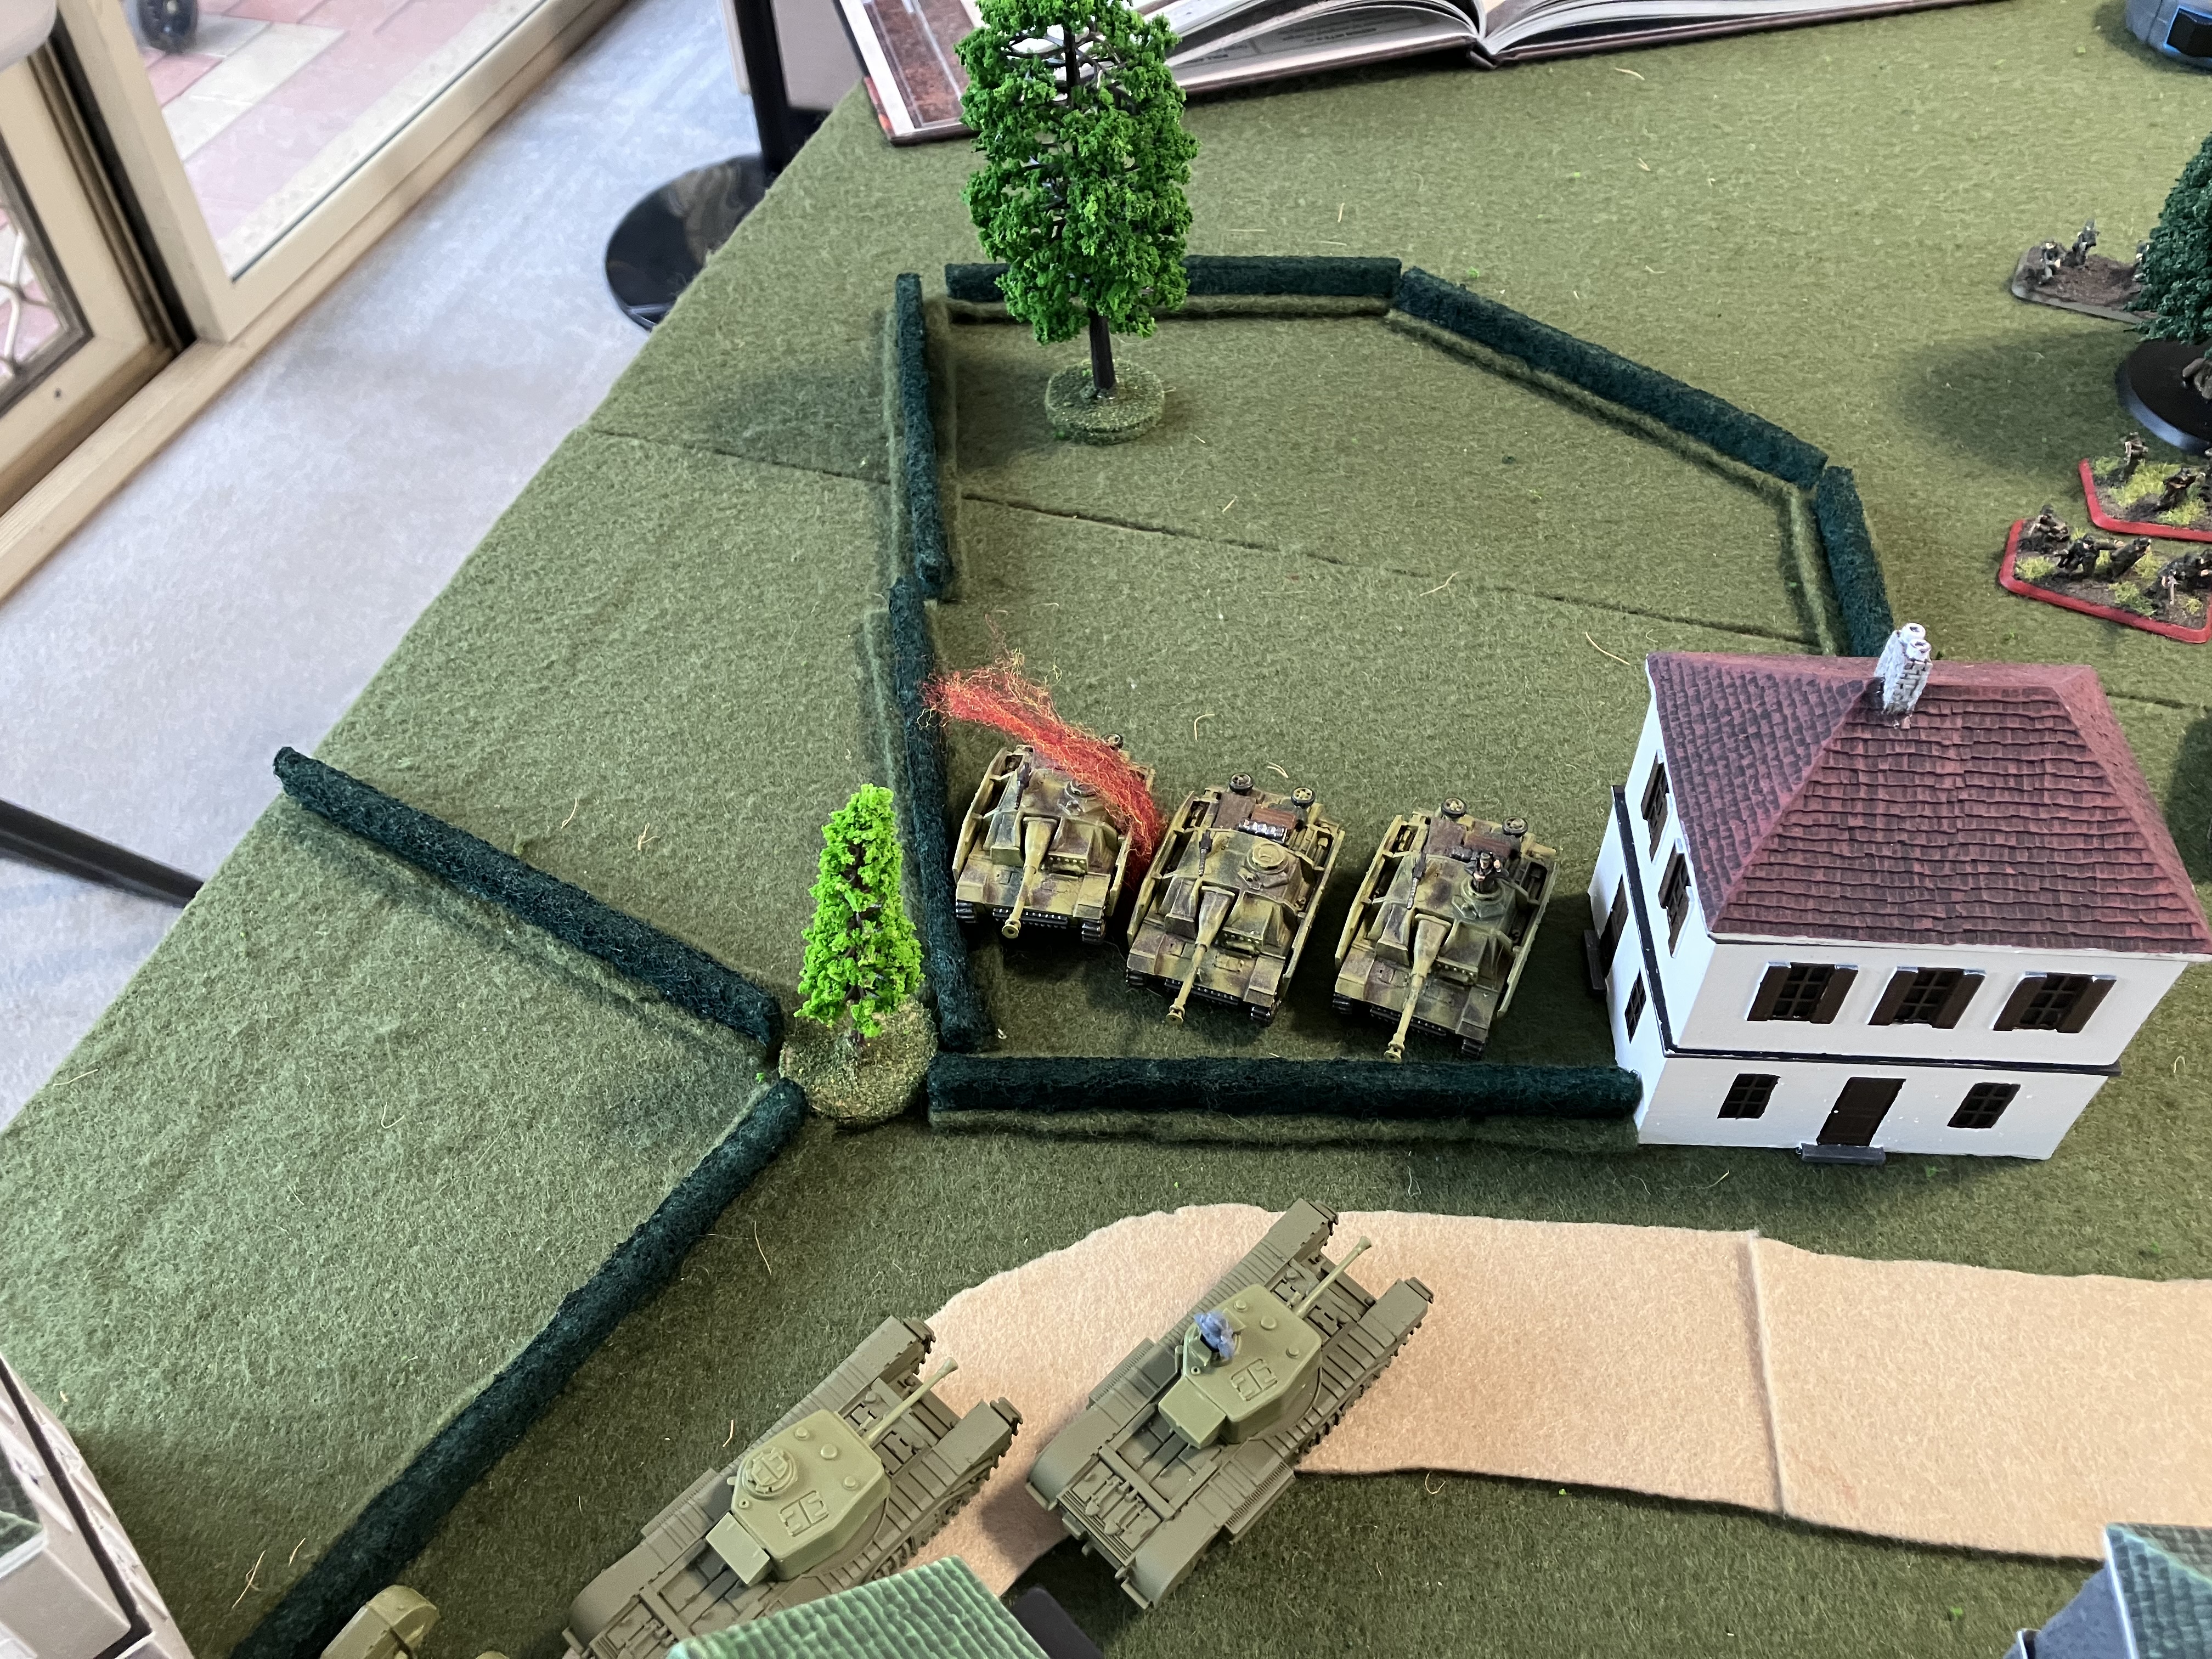
StuG Assault Guns and Panzers move in.
|
Under the cover of Smoke, the StuG Assault Guns and the HQ Platoon of the Panzers move up on the Left flank into better positions. One StuG does get entangled up in the Hedge, slowing down his advance. This single action will prove to be decisive later on..
The British still hold on. Waiting patiently, nervously as the enemy roam nearer. "Where the bloody hell are our Tanks!?" One Soldier was heard crying out. The order was yet to be given to open fire on the advancing Germans. Their Foxholes and Slit-Trenches offer them great protection from anything the Germans could throw at them. Exposing themselves, if they were to stand up to return fire, could prove fatal. They still hold the initiative and the objective - or so they thought.
Suddenly, rumbling down the main road comes the first Troop of Churchill Tanks. Having been caught up in traffic and struggling to maneuver through rubble and fields to the rear, they finally arrive to support the Infantry.
Lieutenant Moore stops his Tank beside a house where a Platoon of Infantry are holding up and calls over Sergeant Fowler, who then indicates that German Armour was spotted moving closer to town behind the house across from them and beyond the hedges. 'Quickly' these Armoured Tractors move further down the road to set up positions to engage the enemy.
 |
Churchill Tanks begin to arrive from the rear.
|
Over on the Right, the Tiger tanks swap rounds with the 6 Pound Guns. Their rounds failing to penetrate their thick, heavy Armour. Rounds either glance off or simply miss. Dirt and dust thrown all around. The Tigers also failing to hit their mark. Not an easy task, trying to hit a low-profile gun whilst on the move and at range.. In the center, too, the Tanks and Infantry push up, tightening, what seems like a noose on the British positions. Spirits were high at this point amongst the German Troops. Although, hot and bothered from slogging it through the fields, they felt that they had the numbers and firepower to easily break the British positions.
One German Soldier later wrote in his diary "We were becoming exhausted, running in the mid-summer heat laden with gear, trying to match the pace of the Armour. But we were determined to win. We knew we must, for our trapped Troops inside the Town."
 |
German Troops tighten the noose.
|
Mortar Bombs rain down on the British position around the destroyed
Tiger objective and on the 17 Pounder positions. One gun is successfully knocked out, killing and injuring its crew. The second gun team panics and flees the Battle. This is not good news for the British here. Machine Gun and Rifle fire whips the air, keeping the
Defenders heads down. Despite all this, the British will not shift. AA
Cannons rake the muddy field with HE rounds, peppering positions, but
it's still not enough. Slowly, cautiously, the Tigers move in to better
positions to increase the rate of fire. This brings them in range of the
6 Pound Guns to effectively harm them. The Infantry on this flank now move into position and ready themselves for the command from their Officer to assault the British.
 |
Troops ready to assault the British.
|
Over on the Left flank, more British Tanks arrive from the rear. Lieutenant Moore radios to Number. 2 Troop that he is holding up the main road, searching for enemy Tanks. As such, Lieutenant Dodson moves his Troop up into positions through the Town itself. Accompanying Lieutenant Moore's Churchill's is a Section of Bren Carrier Wasps to try flush out any entrenched German Troops that might be supporting the Tanks noted earlier.
 |
Wasp Carriers support advancing Churchill's.
|
 |
Lieutenant Dodson moves his Troop through Town.
|
Lieutenant Moore's Troop soon comes into a spot of bother. The StuG Assault Guns open fire from behind the Hedges to reveal themselves, instantly knocking out Lieutenant Moore's Tank. Some of his crew are wounded or even killed. He, himself is unscathed and manages to dismount and take command of his second Tank. In quick succession, a StuG is knocked out and a second Churchill is also knocked out as it moved into better position. The British Troops holding up in the house and surrounding garden wince as they watch their Armour go up in a torrent of smoke and flames. Things are starting to look unsavoury for them.
 |
Lieutenant Moore's Troop move up.
|
 |
Lieutenant Moore is brewed up.
|
German Soldiers supporting the StuG's move up into position to procure the house. This will afford them protection from the Tommies over the road. Here, Leutnant Koppfler ordered his Panzerschreck team forwards to assist the StuG's. In a flurry, they whiffed their shot, falling short on the Churchill's, which then alerted the Vickers MMG's in town. They open up their guns, unleashing a barrage of bullets on Leutnant Koppfler's position. A number of casualties are scored and this puts an end to any further actions here.
Large cracks are heard in town, as high-velocity shells slice the air from the 88mm Guns way off in the Wheat Fields. They have sighted their guns on the now advancing Tanks of Lieutenant Dodson's Troop. Sergeant McKay is instantly knocked out. Furious and somewhat fearsome of the awesome power of the 88mm, Lieutenant Dodson begins to advance up through the Town to better assist the now suffering Lieutenant Moore's Troop. From the rear another Vickers MMG team is called forwards to help out. They set up in a Hedgerow and also begin to put fire down on Leutnant Koppfler's men.
 |
Sergeant McKay is knocked out.
|
 |
Lieutenant Dodson moves up.
|
Short actions are performed along the front, a few Panzers are hit, bailing their crews in fear of internal fires or explosions. But soon their crews get the issues under control and are able to remount and get back into the fight. Machine Guns open up on both sides, rounds whizzing all over the Battlefield. Men are hit or pinned as they desperately seek cover in relatively flat, featureless terrain.
While this is all taking place, the Tiger Tanks on the Right come under serious and accurate fire from the 6 Pound Guns. They successfully hit two Tanks, bailing the crews. Things are starting to look good on the Right for the Anti-Tank Gunners...
 |
Two Tigers are successfully damaged.
|
Oberleutnant Hinklestein, under direct order and co-ordination of
Unteroffizier Haussler orders his men to charge over the road and into
the British positions, now pinned from sustained fire. The action is
bloody and brutal, to say the least. British Troops suffer a great
number of losses. They are eventually over-run and many men are killed
or left to die in under the afternoon Sun.
The objective is now in German hands, but soon it will be heavily contested..
 |
Sergeant Woodcock's Platoon are hit hard.
|
 |
Jerry holds the objective.
|
Seeing
this, Captain Hamlin immediately orders Lieutenant Archer's men onto
that position. His men fix their Bayonets, ready their
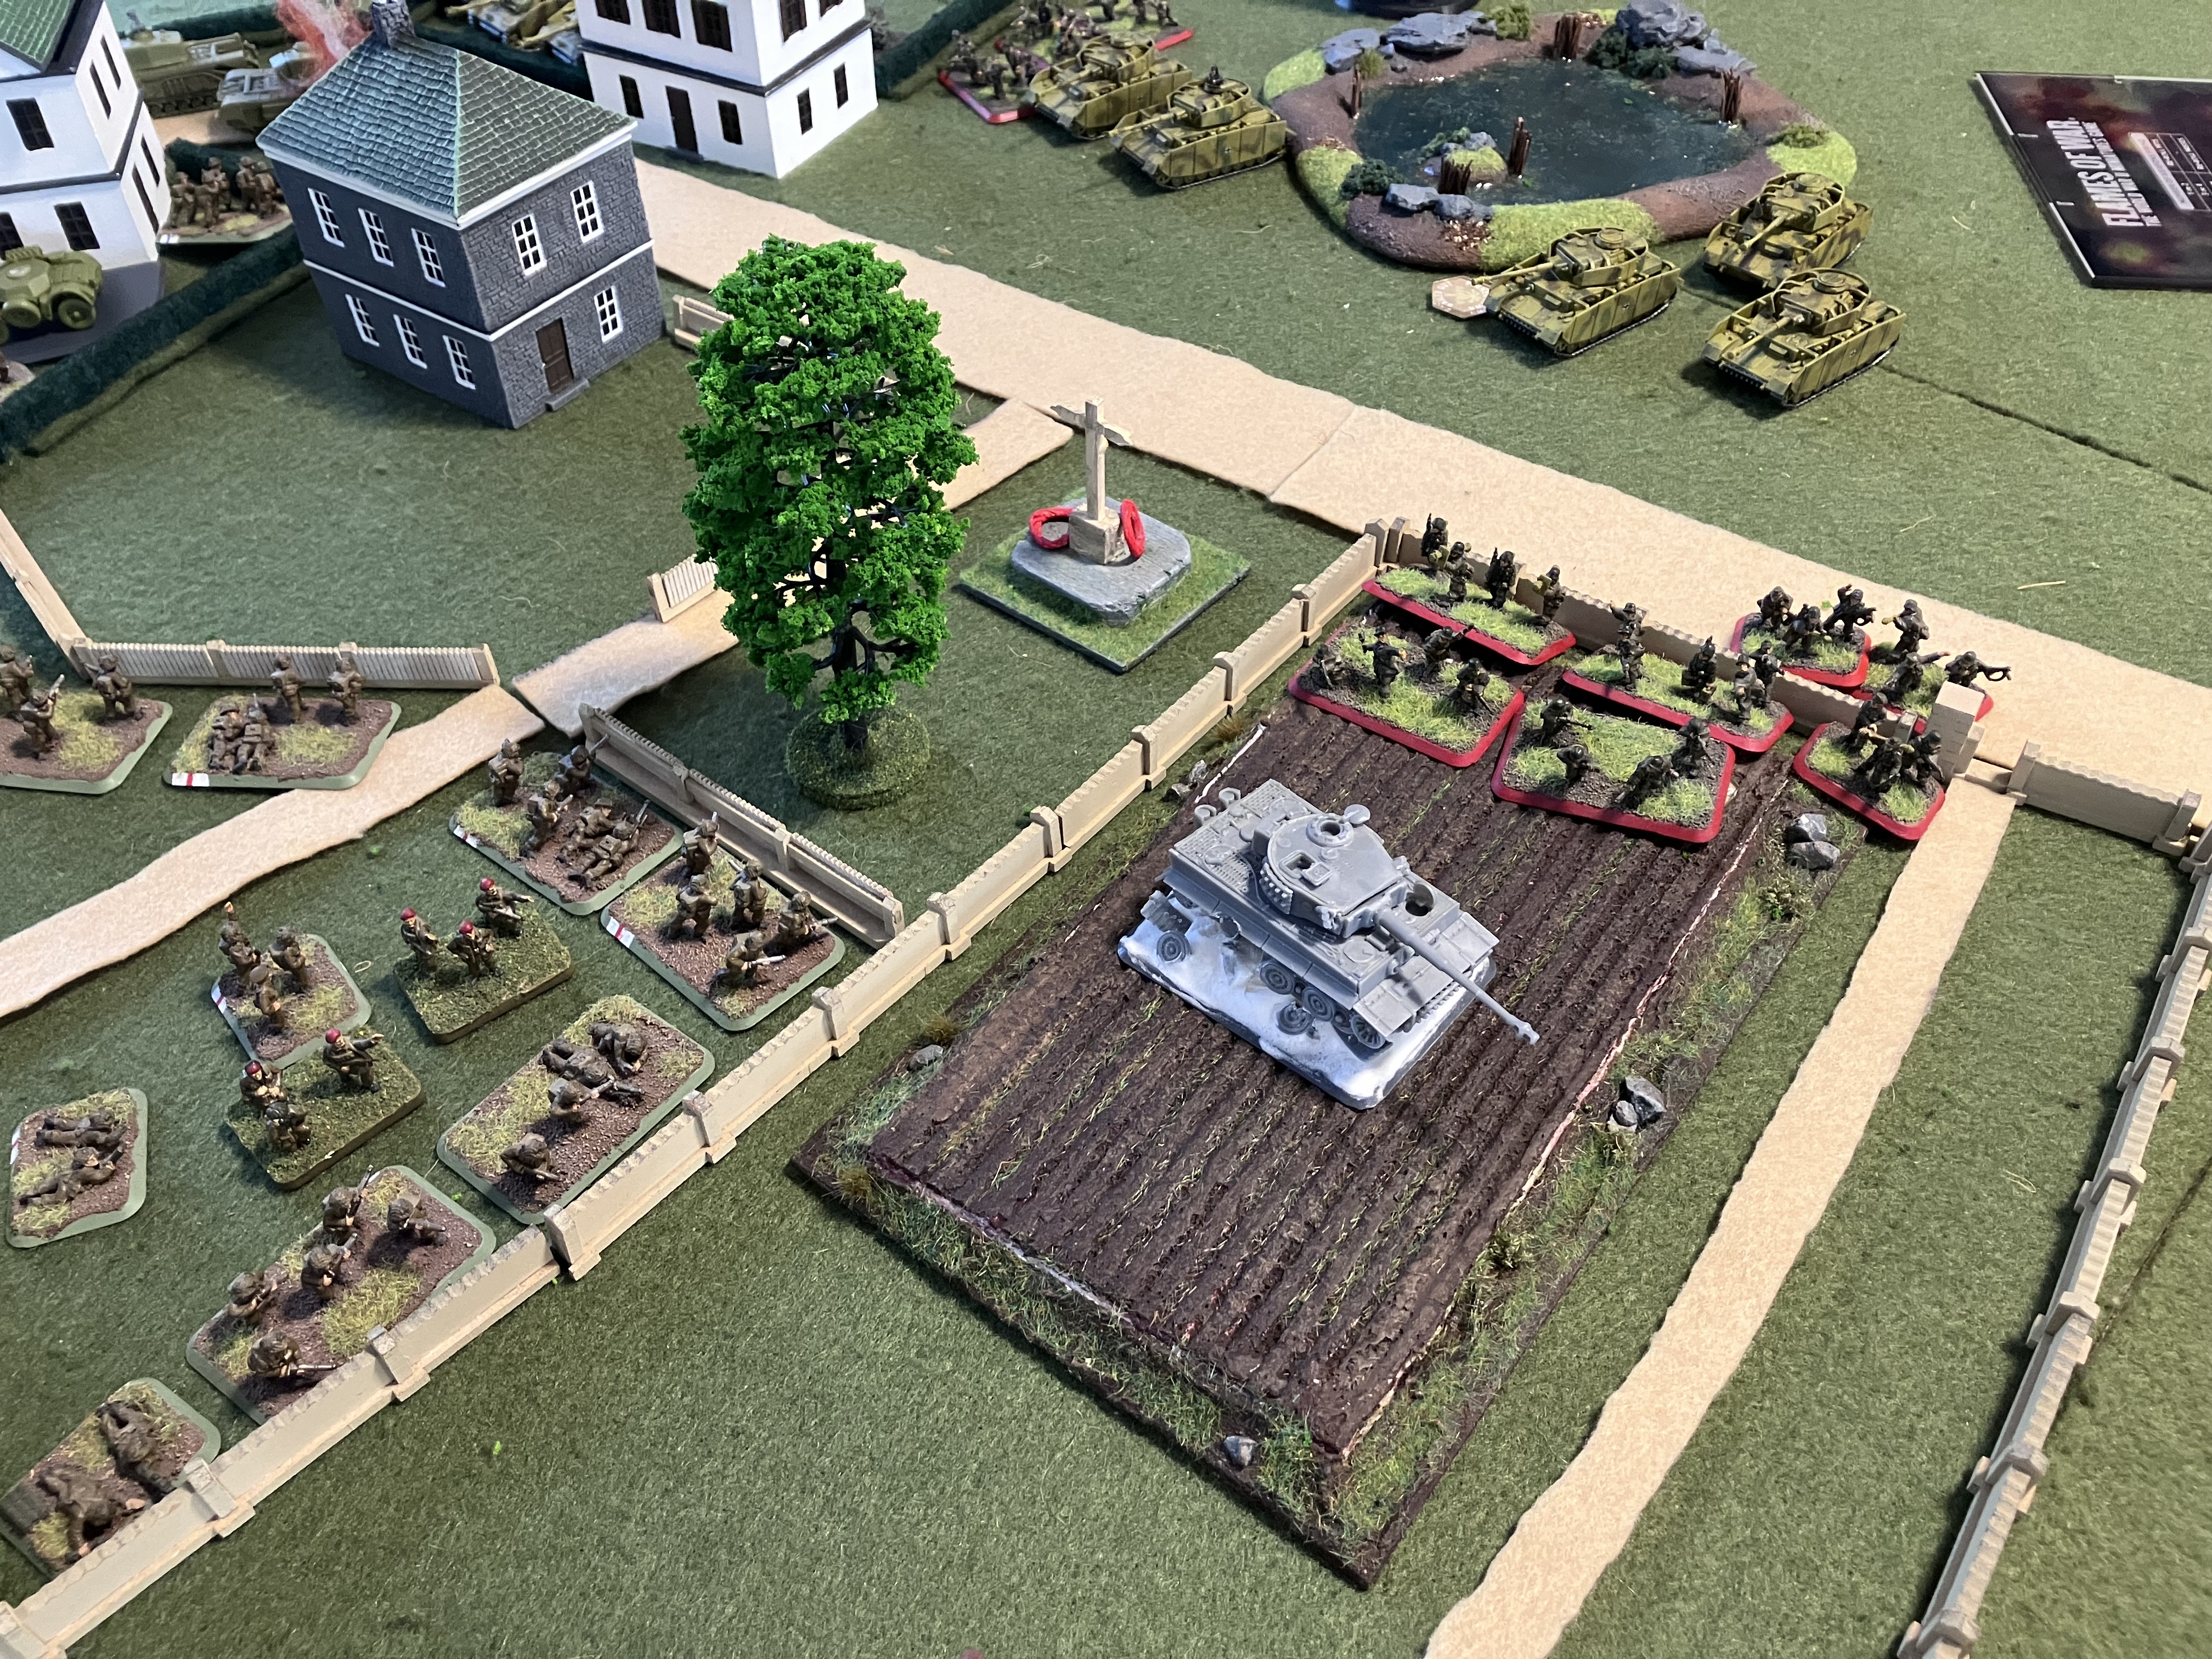
Grenades and move up into position. Under immense pressure from the 88's way out in the Wheat Fields, Lieutenant Dodson has to carefully position his Troop, whilst also engaging the enemy Panzers across the road. Shots are exchanged between the two at no more than a few hundred yards, but dust, dirt and smoke from these exchanges soon make it difficult to fire with precision. Not to mention the 88 rounds flying over-head, certainly keeps nerves fraught with the Churchill crews.
 |
Lieutenant Dodson's Troop exchanges fire.
|
The German Troops on the objective are by now, quite exhausted. Having ran or moved at pace across large open fields, come under some intense fire and successfully assaulting a position, they are in need of rest. This all lends itself to the favour of the British Troops. Lieutenant Archer's men assault the now tired Germans with force. Adrenaline is coursing through their veins as they scream out whilst lobbing the Raspberries into the enemy position. With this, as they lance forwards with Bayonets slicing up any man who dares not move out of the way. This is something British Troops train specifically for and excel in.
Within moments, Oberleutnant Hinklestein's men are a mass of mangled bodies lay strewn over the dead or dying British men from previous actions. Unteroffizier Haussler sees this and immediately pulls back for fear of being captured or killed. The position is once again British.
 |
Lieutenant Archer prepares to assault.
|
 |
The aftermath.
|
The Troops now re-enter the previous Foxholes and Trenches of Sergeant Woodcock's position. The Germans are certainly not done yet, however. Crews remount their Tigers and resume the attack. The dice are cast and all available forces on this flank are thrust into the assault. "We must maintain this position before nightfall!." Unteroffizier Haussler yells out. Suddenly, Tanks of all kinds, Trucks and men move into Lieutenant Archers place. Realising what's happening, the British War Correspondents pull out, so sadly no more photographs of the Battle are available, and we must rely on the accounts of those that were there and survived.
Lieutenant Dodson's Troop was eventually neutralised. The Wasp Carriers had a few attempts at Luetnant Koppfler's position. Some men were mamed by the fire, but not long before they, too, were knocked out. Major Gutteridge from Company H.Q. eventually arrives to see most of his Troops destroyed. He soon left that place to report back to his Seniors. Most actions on the British Left flank eased off, Sergeant Fowler's men would eventually pull off the line, leaving that side for the Germans to mop up.
The 6 Pound Guns were eventually quietened and the Vickers MMG's were able to put effective fire down on anything soft or fleshy that might have moved towards them, stopping their advances. The Panzers and Tigers, however, now had free movement unchecked, and moved in on Lieutenant Archers position, shooting up, maming or simply capturing anyone that surrendered. Captain Hamlin and his Adjutant were also killed or captured.
And thus, concludes the Battle. The Assaults were the Crescendo to the Cacophony of War, that brought to a bitter and violent end this entire action.
Conclusion
I hope the read wasn't too long, rather, it offered a flavourful narrative on the game, which was fun. This was our first Battle after a long rest and I must say, it was quite a thrilling one. We had both grown tired of the game, so the rest was much needed and coming back to it in such a way has reinvigorated my enjoyment of the game. We are already in discussion on the next game, which will be a continuation of this one, but a bit deeper into the Town itself, so I look forward to that one.
As for the game itself. From my perspective, it went almost exactly as how I had imagined it to go on my end. I had incorrectly guessed where Greg's Tigers may have arrived from, and this alone, probably cost me dearly. The single action of the game that turned it around in his favour was the successful Smoke Barrage. This not only neutered my 17 Pound Guns for a turn, which meant they would be shot off the table. But the fact that the StuG's could move up and watch my route of advance from my Armour meant they were kept busy in a closed area, not being able to utilise their mobility too well.
Greg had argued I should have run my Sherman Tanks instead, backed up with the powerful Fireflies, as I would get extra shots and better Firepower with said shots. But that wasn't what I was trying to achieve, or why I was doing this. Could I have had better chances of winning with Shermans? Perhaps, but the 88's would chew them up all the same.
Did I have an absolute blast playing it, watching the minis and scenery blend together in nice picturesque shots for the camera? Absolutely.
Did I enjoy putting together a narrative and story of sorts, despite at the very last moment of the game, losing it all once again? Of course, and that, along with an afternoon shared with a good friend is what this, to me, is all about.
Until the continuation Battle ;)