Showing posts with label Terrain. Show all posts

Monday, 1 May 2023

A Barracks For You!

Ghazy on top of his barracks.

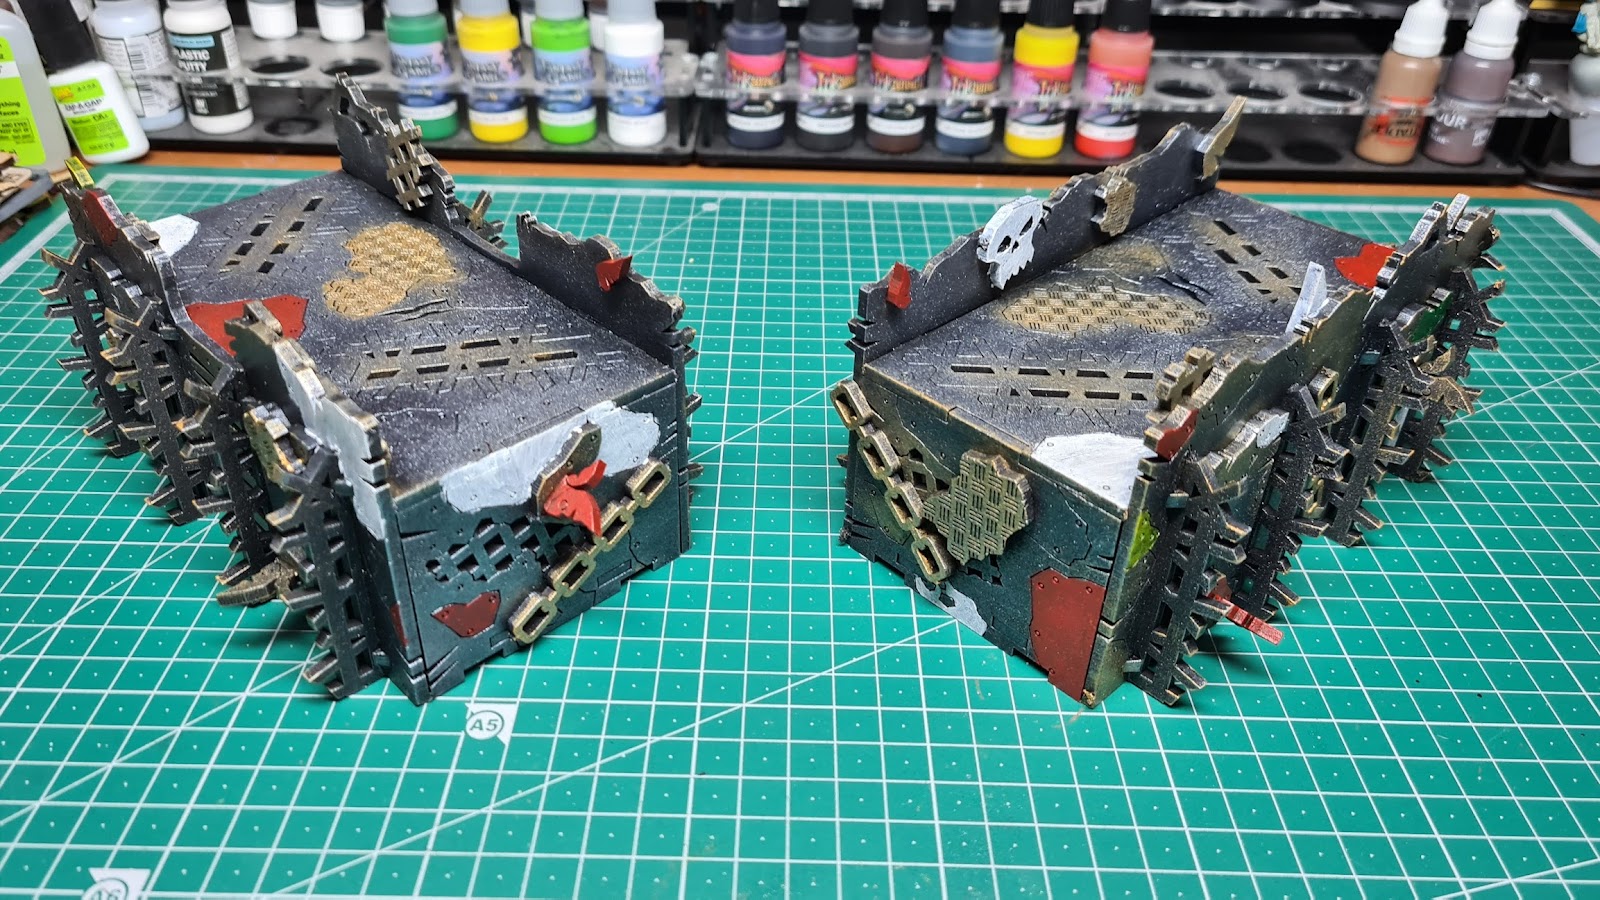
 So in this update, I'm showing off a new Ork Barracks that I've put together and painted. I decided to try some new black spray primer, Rust-O-Leum Flat Black. My thoughts on it is that it covers quite well, if a little thick, and takes longer to dry. It also smells for a lot longer. It is quite good for terrain like this but probably not recommended for miniatures.

The black spray, suitable for terrain.

The kit itself was quite easy to put together, with long strips taking up the majority of the kit. It comes in two major pieces, which fit together to make it a blocky and cylindrical structure. I had bought another cheap silver paint to dry brush onto the black, but it has very weak coverage and required quite vigorous application of the dry brush to even brighten up the structure.

Orky Barracks.

 Pulling out my cheap acrylic paint set, I began blocking in the various colours, without trying to be too neat. These are ork buildings, and so a sloppy job suits it quite nicely. I can only imagine oppressed grots doing a shoddy job just to stave off another beating from the slave masters.

Orky Entrance or Exit?

This building will go well with the rest of my terrain, to make up what could be a section of Mektown, or simply an outpost or fort that the orks are inhabiting. I have more terrain to put together, but will slowly tick away at it while the hobby bug takes over.

An Orky Outhouse. Dear God!

Rooftop Party Area.

My other terrain.

Until next time, happy hobbying.

Thursday, 2 March 2023

A Vortex for Warhammer Fantasy!

Vortex for Warhammer Fantasy.

This update will be a small one, since I've been quite lazy about painting or modelling in general most of February. Saying that, I have had two games of Flames of War with Richard, taking part in a global campaign set during the Market Garden theatre of WW2. I did put together some units for my German Grenadiers, and will be working on them in the future, and I have ordered some more to round out my choices for future games.

The base of the vortex.

In the mean time, I decided to paint this terrain I had nabbed off eBay and simply used a simple colour scheme to knock it out in no time. Quite happy with how it came out, with some washes and light dry brushing to make some of the detail pop. Warhammer doesn't really benefit from a lot of terrain, but a bit more variety helps liven the game up a bit so painting this was a treat, as it was very easy to paint. This is an old GW plastic kit that came out for Age of Sigmar, but it fits quite well in the Old World of Warhammer Fantasy.

Top down of the ring.

I'm about half way through painting Ghazkul as can be seen the background of the first picture, so hopefully he'll be next to be finished, and the three knights I was working are still in the early stages of painting. With a few new videogames that came out for me to play, I'm expecting my hobby time to shrink, and with the new F1 season starting, that as well will eat up my spare time. 

Skulls inside the vortex, maybe a death vortex?

Here's hoping that the Flames of War games I've been having with Richard motivate me to paint up some more Germans, and the new version of Warhammer Armies Project and hopefully some games of it with Joe further motivate me to paint some Bretonnains.

Until next time!

Friday, 20 January 2023

Building Permits Approved in Mektown!

Some Orky Wallls.

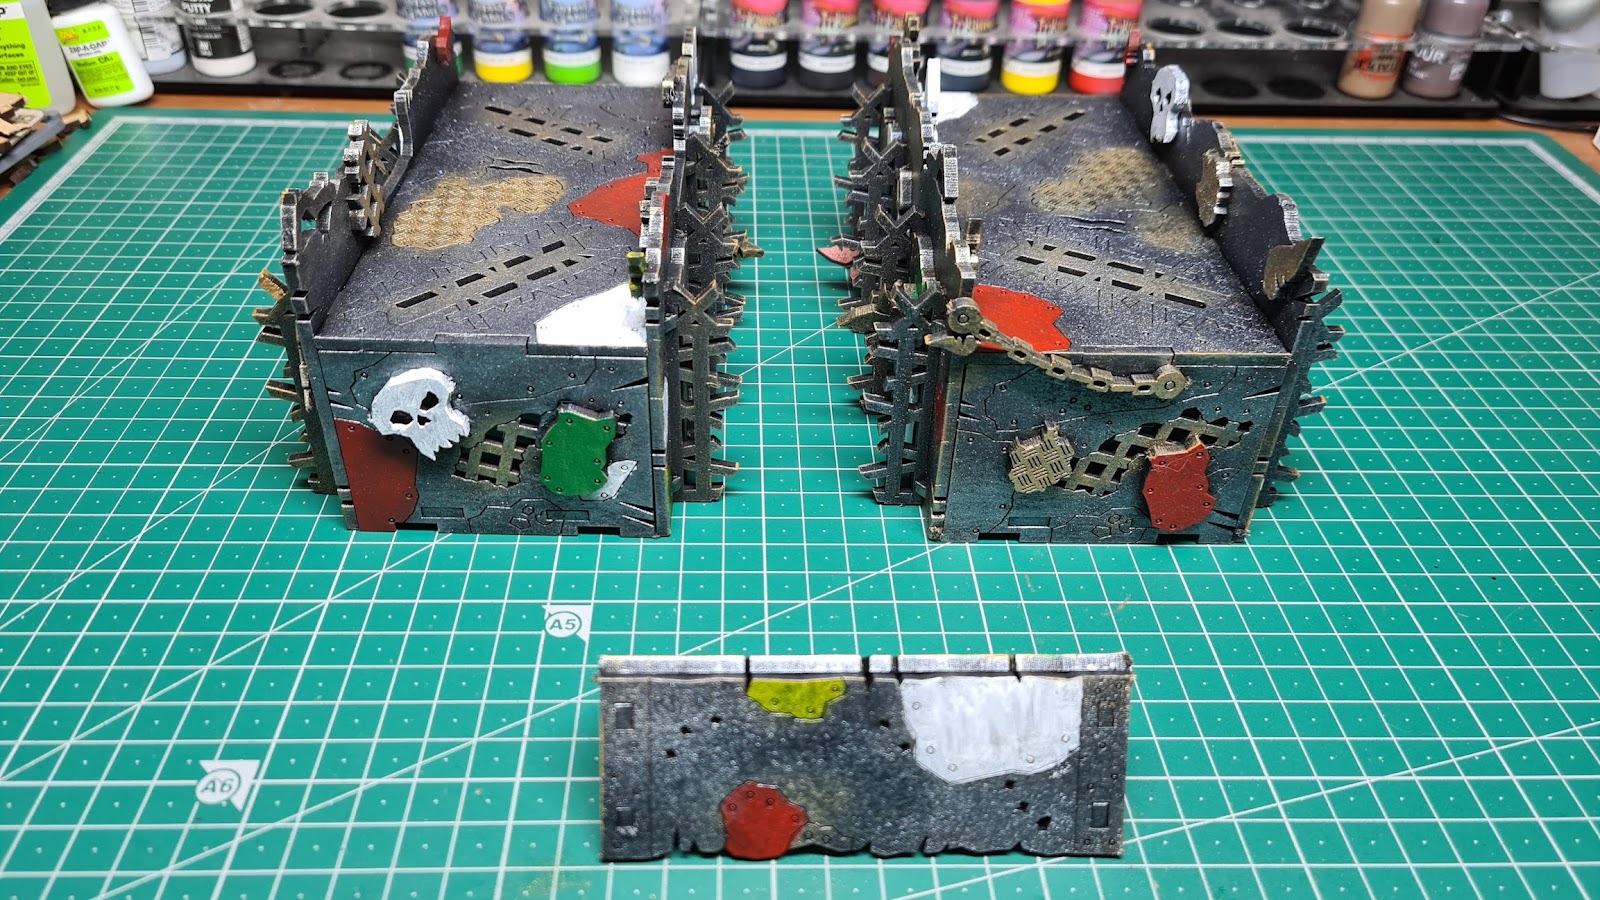
Todays update is more Orky buildings. These pieces of terrain were built by Richard, which he made an update for here Orktism is kicking in. These are MDF laser cut terrain he put together a few weeks ago, and I've finally gotten around to painting them. I painted them with craft paints from Shuttle Arts, a cheap 40 dollar set excellent for painting terrain pieces.

Shuttle Arts Craft Paint.

I started with a black primer on the buildings using Army Painter Matt Black, but in the future I'm going to look for a cheap alternative from the hardware store, since the rattle can from Army Painter is over 25 dollars usually. Following the primer, I applied two coats of silver dry brush all over the whole thing, followed by a two to one mix of gold and brown, and dry brushing along the edges and covering grates and gribbles.

The Main Gate.

The red and the white were the dominant block colours I used to break up the terrain, to make it look ramshackle and bodged together. I like the white washed look of the white, and the other colours also look like a poor paint job by these orks that built these walls and buildings, which fits perfectly in orky culture.

A ruined wall section.

The yellow was quite difficult to apply in a meaningful way and it was the only colour I felt needed another coat just to make it stand out. These two pieces really fit together and it wasn't until I painted them did I realise that they are part of the same wall section, but broken apart by what I imagine is a rather large explosion or an over eager truck racer.


Two intact wall section.


The walls and a small tent?

The green didn't apply as well as I expected it to, with most greens I've used going on quite smooth and well, but the colours all applied about as well as one another, with the yellow being the most difficult, but that's most yellows anyway. I used yellow and green sparingly, with green the least used out of all of them.


Da Nobz looking out over their walls.


The gate actually goes up and down.

Overall quite pleased with how these terrain pieces are coming along, quite easy to paint and looking excellent. Can't wait to get them all on a table and have my Orks duke it out with Richards Salamanders.

Wednesday, 28 December 2022

Welcoming three new boys to Mektown!


The beginning of Mektown.


So for this update, I was planning on showing off more Bretonnian Knights, but instead we're taking a ride into Mektown! On a whim, Richard and I decided to put together some MDF terrain I had bought years ago designed for Warhammer 40k Orks. I've got quite a bit of terrain to put together, and I selected to put together the Grub Hut and the Grog Tank, white Richard put together the more difficult Ork Lookout Tower.

Grub Hut.

Grog Tank.

Yoofs on the Lookout.


Of course I wasn't done there, pulling out a can of black spray, I sprayed them both top to bottom, inside and out, and begun to dry brush them all silver. During this, Richard was getting a crash course on painting orks, with these three orks as the test subjects. While he was painting his ork, I was fixating on painting the terrain, along with painting two of the models alongside him.

Richards Yoof in the centre, the others are mine.

The centre ork is the one Richard painted, and we used all Army Painter paints to paint them. They are old models from the old Gorkamorka starter set from way back in 1997. These models I like simply because they are a mix of the old goofy Space Ork models and the new direction that Orks went when the new Orks went around this time.


Yoof with Slugga and Choppa.
Yoof with Six Shoota and Knife.
Yoof with Slugga and Knuckles.

They are quite a bit small for this terrain though, but that's fine since they will mostly be used as Yoofs for any mob they join, young inexperienced orks who need to cut their teef and prove they are tough!


Yoofs are in charge!

The Nob kicking them out of his shop.

Small skirmish between the Nob and prospective Yoofs.

The terrain was quite simple to paint, with red and white and green to sprinkle some colour around on panels and the signage. Bronze was also dry brushed sparingly around to simulate rusting to an extent, and even to paint the grating and some panels too. Considering this all took one afternoon from construction to finished paintjob, I'm quite pleased with the results.

Until next time!

Sunday, 1 October 2017

Ploughed Field 3/3


For my third and final ploughed field, I decided to try my hand at a bombed field. Following the same steps as the first two, I glued the sponge to the base and began to cut up bits of the sponge. Using the spak filler, I filled the holes and smoothed them out to look like impact craters. It was a little fiddly to do, and took a few days of touching up and leaving to dry.


Next, I added the base coat of paint. Testing to see how the craters would look, I soon realised I needed to lighten to tone of the entire field, mixing much White to the Burnt Umber. Once it dried, I noticed that some of the filler peeled or broke as the sponge was soft and shifted its form as I painted. It, too, took a few days of adding numerous coats.


Following the same steps as my first field, I began to cut up and glue my fences together. This time, I decided to try something different and make a telephone pole as well. For this, I used a kebab skewer, cut it to size, smoothed it and glued on some 'arms'. Once dried, I hot glued the fences to the base, making sure to make some of them look damaged or destroyed by the Artillery, then began to paint them. Once again, I used a base coat of Burnt Umber followed by a mix of Raw Sienna for a second, lighter coat. Then I added the White and gave them a drybrush to highlight them a bit more. Once I finished that, I added the watered down PVA glue to the base and added the Grass Tufts and the Flock.


Thursday, 21 September 2017

Felt Roads Just Leveled Up to Level 3!!!

Quite a whiles back we had the idea to make some roads for Flames of War, and we quickly decided we wanted something modular and easy to make. We came across a Youtube tutorial on making roads out of fabric, dyeing it black/grey, and spraying with PVA mixture. It was a nice idea, but I wasn't convinced on the spraying of PVA and also wanted something rough looking.

This is where instead of old jeans like the tutorial called for, we decided to use felt as a replacement material. We bought a heap of felt and started cutting it up into pieces of roads.
Straight cut piece of brown felt.
Once this was done, we brushed them a mixture of darker browns, followed by a green brush on the sides to simulate grass on the edges. This however did not work well, with the green quickly being drowned out by the brown and fading over time too.
It looks good on its own, but on my green felt table,
it looks too much out of place.
One night, while working on the fences, I was messing around with the spare green felt and test fitted some to the road, just curious how it would look. It looked great, I was amazed at the effect it had. Not only was the green felt better looking than the green paint, but it added a bit of depth to the road. 
It now looks more defined, with the road being clearly recognizable,
while matching the table as well.
I quickly laid it down onto my table, which is just four boards covered in green felt, and it was an obvious improvement. I quickly got to work cutting out more green felt, cutting them all to fit each felt, as one piece per side. The whole process is quite easy, and in one night, managed to do all the weird shapes, followed by the straight sections the next night.
Green felt cut to size. PVA used to glue it into place.
Its as simple as it sounds, cut the felt to size and glue it on with PVA. I made sure to cut the strips longer than the brown felt, to avoid mistakes in sizing.
Green felt is longer, to avoid mistakes.
Simply cut them after they are set, then they are ready to go on the table.
One down, twenty more to go!
With all of them complete, it was time to see how they all look on the table.
All of them laid out on the table.
Here's one configuration, using as many as I could without it being disconnected. The green felt already makes the roads look more neat.
Looks quite busy for a dirt road.
Since I had the table out, I decided to go all out and decorate it. First I added the trees I've recently based, with some of the houses to boot.
Trees and houses.
After this, I added fields and fences. The green felt on the roads is a good indicator of how far the fences should be from the roads. If you want them closer to the road, then that can be done too.
Fields and fences.
Again, I feel like more fences are in order, even after making those bush fences, I feel we still don't have enough to make it look believable.

Overall, I'm quite happy with how to roads now look, they've added a bit of depth to the battlefields and look more neat. Only thing I'd like to make is some dead end pieces. Some dead ends will help building a road system that's not too busy or convoluted. This will go on the to-do list.

Hope you've enjoyed this update, and stay tuned for more.

Monday, 18 September 2017

Dirt Roads


This isn't something new for us, however, I have decided to make some additional sections of road and thought it would be worth sharing. The idea isn't one of our own, but rather, passed on to us from another FoW player / terrain builder. Our particular road sections are a little more simplistic, and still give us good playing terrain.

From a local hobbies and crafts shop, I bought several 30x20cm Brown Felt squares. Designing 4" wide road sections, I cut them up and began to paint them. I used Burnt Umber as the base coat mixed with a touch of water to allow the paint to soak into the felt, and to act as a scrub to remove any loose felt. I then mixed Raw Sienna into the Umber which made a sort of Tan tone. I scratched that into the middle of the felt to give the impression that heavy traffic had been moving along the dirt roads. Finally, I used a Light Green and scraped along the edges to give a 'grass' look, and left them to dry.

This technique, we had tried before, but found the Green faded. As such, spare Green Felt from designing the game board is being cut up and glued over the top to add a bit of depth and detail instead. It's an idea only just being tried, but is so far looking promising. In the future, using these techniques, I would like to make longer, thinner dirt tracks, just for different terrain bits to use on the board.


Meganobs

 This update is focused on some rebasing work I've done. After finishing my Deff Dredd, I decided to rebase these Meganobs to fit my arm...