Friday, 20 January 2023

Building Permits Approved in Mektown!

Some Orky Wallls.

Todays update is more Orky buildings. These pieces of terrain were built by Richard, which he made an update for here Orktism is kicking in. These are MDF laser cut terrain he put together a few weeks ago, and I've finally gotten around to painting them. I painted them with craft paints from Shuttle Arts, a cheap 40 dollar set excellent for painting terrain pieces.

Shuttle Arts Craft Paint.

I started with a black primer on the buildings using Army Painter Matt Black, but in the future I'm going to look for a cheap alternative from the hardware store, since the rattle can from Army Painter is over 25 dollars usually. Following the primer, I applied two coats of silver dry brush all over the whole thing, followed by a two to one mix of gold and brown, and dry brushing along the edges and covering grates and gribbles.

The Main Gate.

The red and the white were the dominant block colours I used to break up the terrain, to make it look ramshackle and bodged together. I like the white washed look of the white, and the other colours also look like a poor paint job by these orks that built these walls and buildings, which fits perfectly in orky culture.

A ruined wall section.

The yellow was quite difficult to apply in a meaningful way and it was the only colour I felt needed another coat just to make it stand out. These two pieces really fit together and it wasn't until I painted them did I realise that they are part of the same wall section, but broken apart by what I imagine is a rather large explosion or an over eager truck racer.


Two intact wall section.


The walls and a small tent?

The green didn't apply as well as I expected it to, with most greens I've used going on quite smooth and well, but the colours all applied about as well as one another, with the yellow being the most difficult, but that's most yellows anyway. I used yellow and green sparingly, with green the least used out of all of them.


Da Nobz looking out over their walls.


The gate actually goes up and down.

Overall quite pleased with how these terrain pieces are coming along, quite easy to paint and looking excellent. Can't wait to get them all on a table and have my Orks duke it out with Richards Salamanders.

Sunday, 15 January 2023

The Big Boyz are back in Mektown!


Five Ork Nobz for Warhammer 40k or GorkaMorka.

I begun painting these five models late last year, and with Richard deciding he wanted to work on an ork of his own, I continued working on these five with him. These Nobz are part of the box set Prophecy of the Wolf, which came with Space Wolves as opposing enemy that I finished painting back in September.


Ork Nob with Kombi-Rokkit.
Ork Nob with 'Uge Choppa.

Ork Nob with Power Klaw.


These five are part of an Ork force consisting of Ghazgshkull Thraka, Makari, three Meganobz and one Grot Oiler and Ammo Runt. These guys will be used in GorkaMorka as Mob leaders, and they have a variety of weapons for more choice when making leaders. I painted them up in the traditional Ork way to represent the Goffs Klan in Warhammer 40k, but I threw in some yellow and red to add some colour variety. The skin was done in a similar way to the Ork Boyz from before, but substituting Vallejo Model paints and using Biel Tan Wash from Citadel.

                                                Two Ork Nobz with Sluggas and Choppas.

As they are Goff Orks, I left their coats black, but decided to paint their pants brown, to vary up the theme a bit. The browns were Vallejo Model Colour Beige Brown for the pants, and Vallejo Model Colour Flat Brown for the belts and straps. The rope necklace, teeth, nail, bones were painted Vallejo Model Colour Desert Yellow, and the teeth and nails were further highlighted with Vallejo Model Colour Pale Sand. These were then washed with Citadel Agarax Earthshade.

These two look like brothers.

The steel plates, armour and weapons were a combination of Vallejo Model Colour Natural Steel and Vallejo Model Colour Brass and any red trimming on the metal was Vallejo Model Colour Flat Red. They were all washed Citadel Nuln Oil. The boots and vests were simply left Army Painter Black Primer, for simplicity sake.

Youz do da shootin' an' I'z gonna do da choppin'.

The cabling was painted with a colour I didn't intend to use, but Richard randomly plucked out a Panzer Aces colour while we were talking about teal as a colour. Vallejo Panzer Aces Periscope surprisingly is a nice blue, which looks like it would fit in an electrical box full of wires. It might be a colour I come back to, since it covers rather nicely, and I might have to consider the Panzer Aces range more in the future when picking paints to use. The bases were dome simply with Vallejo Texture Desert Sand and an Army Pinter Soft Wash. I still haven't found a substitute for it from both Vallejo and Citadel, so its still my go to for a lighter and brighter brown wash.

Next on my to-do list for the Space Orks is probably going to be Ghazgshkull himself. 

Till next time!

Wednesday, 11 January 2023

Scrap Metal Counters

 Not too long ago I was digging around on the interwebs for piccies of an Ork Kannon. Building my Mob I wanted to arm a dude with one, but I wasn't sure what it was. Google led me to the Subleddits and here I was introduced to a small online community of guys with a passion for GorkaMorka. Upon browsing this, I came across a post someone made of their own scrap metal counters. They looked great and it prompted me to make some of my own.

Having a bunch of 25mm bases spare from previous projects for Flames of War, I thought they'd be perfect for this project. To add to the bases, I either cut up bits of sprue, used spare bits of weapons or off-cuts from other Ork weapons as I kit-bashed a bunch of weapons, or I went rummaging through my Flames of War spare bits box. I also bought some cheap hobby/craft necklace too.

I applied a small amount of spak filler to each base and glued on the bits and pieces trying to assemble them into varying arrangements to look like piles or stocks of junk or abandoned gear. A Black priemer was then applied, then I sat down to paint them.


I am pretty happy with how they've turned out. The counter with girder and fence is probably my least favourite as it didn't quite come out as I had imagined, but the counters with the rusted cannister, the flat worn Red plate and the hose and armour plate I am very happy with. Happy with how the colours came out, the worn effects applied and happy with the dusting from the pigment applied, they will be a nice addition to our growing game and could possibly be added to the 40K games as scatter, I dunno.

Monday, 9 January 2023

Orktism is kicking in

With the resurgence in GorkaMorka of late, and the move forwards to Warhammer 40K, Greg and I decided to dig up some of his terrain he bought a few years ago. In his previous post he made, we put a couple pieces together and  He painted them up in one afternoon. 

I was fairly impressed with how well it fit together, albeit the rather lacklustre instructions.. They fit quite nicely and were rather simple to build. The detail was quite pronounced in the flat surfaces with plenty of Orkish extras to chuck on for more flavour.

With this, I decided I would take home a handful of packs myself to put them together to reduce time needed in putting everything together. Below I will post a bunch of pictures of the finished build. They are unpainted for now as I will leave that to Greg to paint up as he wishes, so I am sure we will eventually see the final product posted here at some point.

To start, I will post a few basic Ork Walls. These came in two types, a Straight Wall and a Ruined Wall. The first picture is of the the Straight Wall. Nice, bulky pieces of terrain with inbuilt ladders to climb up. Some high lips to give cover to models on the top, they look menacing and rather sturdy.


Secondly is the Ruined Walls. They look like they've seen their share of action and probably allow for models to move with ease within the walls, making them a great spot for ambushes.. 


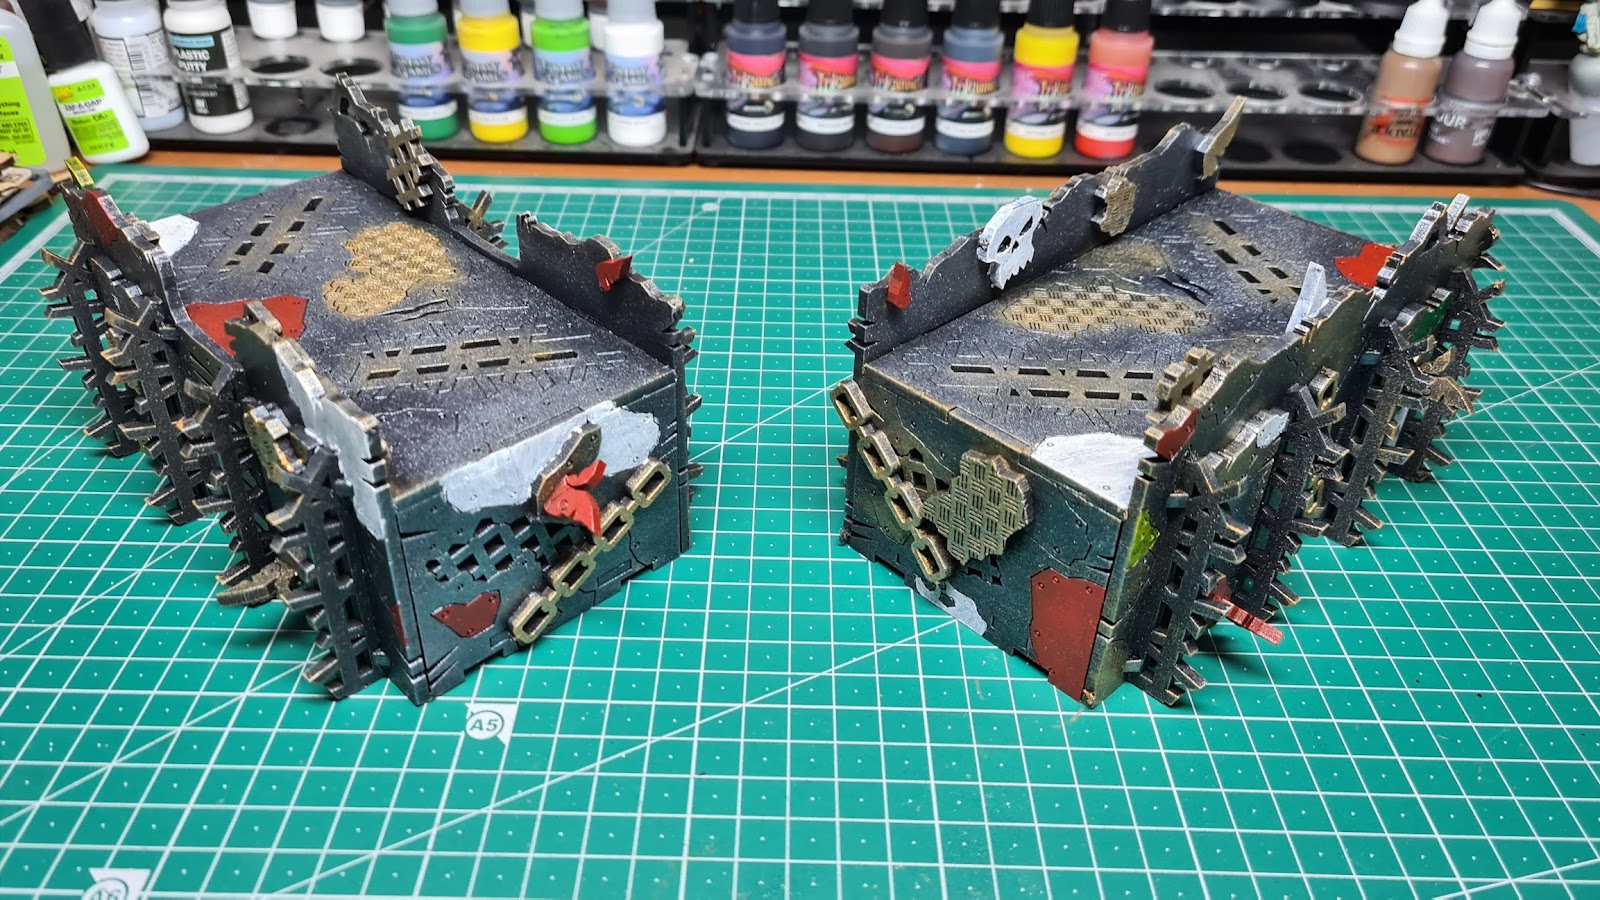
Finally, and my personal favourite piece so far, the Ork Gate. This thing looks strong and intimidating. The Skullz on the front would surely be a deterrent to any passing Mob and may suggest that attacking the Gate will incite a great deal of pain.


The piece is bulky, sturdy and looks fantastic. The huge linked chains really sell the look to me, along with the spikey fence along the top. The fact that the Gate opens and shuts is a lovely little detail. I had sanded the edges down a touch to reduce drag once painted up. Watching the Jawz open and shut, swallowing a speeding Buggy or Trukk will sell the immersion, I think. 

It does, however, come with some other piece. I have no idea what it is. It looks like some kind of roof or perhaps a barrier? I don't know. The instructions just end once it's built and it isn't quite clear what it is or what it's for.

So here that is.


Finally, a shot of all the pieces built together in a nice shot. I am sure Greg will appreciate them and we look forward to using them in both GorkaMorka and 40K. Once painted, they will look fantastic.


In the near future I am sure we will work on the larger terrain pieces together and it will be posted about. For myself, I do have a couple smaller things to work on of my own that I don't wish to post just yet, not until it is finished.

Saturday, 7 January 2023

Unique Characters and models

 Going back to the Normandy Landings here, the inspiration came from reading up on the Para drops and flicking through the front of the British D-Day book for Flames of War. There's mention of a Lieutenant-Colonel Peter Luard who rallied his men to the sound of his horn. Something I like, and kind of miss, is the use of unique character models, so I figured I would design one myself.

It's not the best looking model by any means, but I can easily identify him at all times. I figured the Horn he used was probably Brass, or some other kind of metal. However, I wouldn't be able to get a good enough shape with the Miliput I had at hand. So, given how rough it would have looked - especially for the 15mm scale it plays at - I figured a nice Bull Horn of some kind would look a little more appropriate and maybe even stands out as being a little more eccentric. I like to think he fashioned it whilst in some downtime in England, before the jump, but anyway...


Next are a combination of both a Sniper and a Medic with Stretcher Bearer team. Again, the Medic isn't something that has any model or rules for it, but that didn't stop me from wanting to build one and just flesh out my Platoon with something a little different.
The Sniper was previously a model that could be bought and run in older versions of the game, but sadly, has since been omitted from the rules. I do have a list or two with a Sniper included, so I can still potentially run the model, but again, I wanted to do it anyway.


The Medic was put together using a spare Rifleman, whose Rifle I cut down. His armband was a small strip of tissue glued on then painted. The Satchel was a piece of bluetac cut to shape, glued on and painted over. Both a little tricky to do, but I was very pleased with how it came together. Secondly, the Stretcher team were put together using spare 3" Mortar Crew I didn't need. The arms were cut and re-positioned and the Stretcher was made using two bits of metal wire - I think from a Paperclip.. then covered with Baking paper. It looked good enough to me.

As for the Sniper team, I used a guy with Binoculars as his Spotter and an ordinary crouched Rifleman. I glued a small off-cut of the metal wire used for the Stretcher. I think it gives the impression of an attached Scope. It is partially hidden by some Camo Netting I added though. Using a small bit of Wood from a branch, I gave them some cover as detail.


Crocodiles

 Adding some nice heavy Infantry Support for my Paras, I went and put together some Battlefront Churchill Tanks. I went with three Crocodile variants and designed them around a Historical unit.


Nothing too fanciful. It was fun building them around some real Tanks and their crew. Writing the names on, however, was not... They have proved themselves somewhat in battle, removing some pesky Germans holding a building or two. Well worth the points.

Normandy Farmstead

Looking at numerous pictures and maps online, often do I see some kind of Farmstead within tall walls, creating a miniature compound which looks fun to design and build, and probably easily defendable with men and guns. I decided to try design one myself and I was very happy with how it turned out.

Using up the remaining bits of Balsa wood, I made some walls, carving in bricks to look like a section of wall. A bit tedious, but it paid off..


Now the house is one of the pre-built houses Greg bought in a set online some time ago, but the Barn I built from scratch from other bits of wood lying around. I wasn't too happy with how it turned out, as it looked more like an American Barn than it did of one from Medieval Normandy.

To work around this, I asked my French friend for some tips and ideas, and using some pics for reference, I re-designed the thing from scratch, using the same technique as the walls.


Some windows were added with shutters and a loft - though not functional in any way, adds a little bit of detail at least. For the tiling, I bought a pack of textured plastic from my local Hobby Shop and cut it up. Again, a bit tedious, but it did pay off..


Next was the garden. This was made using bits of gravel to make a garden bed, some mud texture and bits of flock I have. To make some tall crops, I have some cheap plastic plant things I bought from a $1 shop and added a stick to it. Finally, using bits of tissue paper cut and glued together, I made some Cabbages.


Now all's that was left to be done was to stick it all together and paint it up. I applied some fake moss I found at some Hobby shop for more detail to the walls.


Some men seek refuge in the Farmstead as they carry the wounded whilst under Artillery Fire..

M-10 3-Inch Gun

 Having had another battle recently, I was again, put in the mood to paint something. This time, I decided on something quick and easy. I we...