Tuesday, 16 January 2018

Update


After some time away - after my Daughter spilled water on our laptop and various other family commitments, I'm finally back on a laptop and able to share what I've done. With life being busy, developments in my hobby have been a little bit slow, but I definitely haven't stopped. With the recent surprise Airborne Company as a birthday gift, I have had a number of battles with Lt. Sean Topper (they're currently 3-1 in victories) and am hoping to create a Battle Report in the future. I've slowly been chipping away at building the Army up to a 2,000 point strong force and look forward to playing with them in more battles.

Using some spare bits and pieces lying around, I, with the help of my Daughter have managed to build a single piece of field terrain, mostly just to fill space on the board and to keep myself occupied with the hobby. It was using the same techniques as before, so it was rather easy and quick to build.


Following some ideas for a long grass piece using a faux fur mat, I'm currently in the process of building an abandoned farm. It's slowly coming together, and for my first attempt I'm quite pleased with how it's looking. Definitely a fun experience building it. I'm in the final steps of adding some painted string to simulate rope and feel it works rather well.


Lastly, I'm working on a Hawker Typhoon model for Air Support plus some Heavy Weapons Teams consisting of 6 Pounder AT Guns, 3" and 4" Mortars and Vickers HMG's for my list.


Monday, 11 December 2017

1st British Paras in Normandy


So this year as a present I decided to get A Proper Cuppa a present. Not just any present though, but something I knew he's been wanting. A British Parachute Infantry Company. At least the beginning of a company. Of course I had to do this without his knowing, so updating the blog was out of the question! I started shopping around, looking to see what I could get for around AU$100. First port of call was Battlefront, and looking at their British Para Company box set for US$54 from their direct online store was something I was considering.


The next port of call was Plastic Soldier Company. They were offering the a British Para Company box set for UK£22. Checking with my usual eBay dealer I noticed he had the PSC variant in stock, and was discounted to boot.


What really made my decision to go with PSC was the fact that the British Heavy Weapons box set from PSC was quite a good deal and was being discounted on the same sellers store. So I went with that. Only other thing I needed to buy was some bases. Got my hands on some MDF cut bases from eBay and I was ready to star work on them.


Cleaning them from flash was almost non existent. The molds were quite good and detail at this scale is something I'm not fussed about, but these were good as well. So putting them together was a breeze, but the bases have no slots for the models, and it meant they were not ideal for basing. What I then did to smooth out the bases was use filler to coat the bases. The effect wasn't perfect but with flock I was sure was going to look good. A quick spray of PSC British uniform spray and I was ready to do some camo work.

Earliest photo I have of these guys, camo already done.

The camo was simply randomly applied with the first colour being Army Painter Army Green, secondly I applied Vallejo Reflective Green and lastly Vallejo Beige Brown. It was a long and boring process, something I hope not to repeat in a long time.

Camo Colours used.

The next colour to go with was Vallejo Khaki for the webbing and straps. This was followed by Vallejo Black Grey for the boots, then Vallejo Flat Flesh for the skin. Reflective Green was used again for the helmets, and Army Painter Pure Red for the berets. The rifles were done with Vallejo New Wood and Army Painter Plate Mail Metal. The bren guns were also the same colours, with the stock being brown.

The boys just before their wash.

After all the colours were done, it was time for a wash. An Army Painter Soft Tone Quickshade wash. This wash is quite good if you're looking to wash whole models to add detail, and it also protects your paint job. It does set glossy, so you will have to spray the your miniatures with a matte spray.

Complete models right after a matte spray coat on them.

The final thing to do was apply flock. For these guys I went with a rough 30/70 mix of Woodland Scenic Earth/Green Blend Blended Turf mix. Bit of PVA and a dunk in the flock and project complete. With all of them done, I was finally able to present them as a gift to my good friend.

About 1000 points in FoW.

Vickers HMG.


3" Mortars.


Company Command.


Rifle Platoon #1.


Rifle Platoon #2.


Rifle Platoon #3.

Hope you've enjoyed this update, and stay tuned for more.

Thursday, 30 November 2017

Not Dead Yet!

As the title says, not dead yet.
It's been almost 8 weeks since the last update, but I'm still doing some hobby. I AM a little burnt out on it though, and with the secret project I've been working on, the updates have dried up. The only thing other than my secret project that I've complete was a Warhammer Goblin Shaman.

GW Goblin Shaman.

Suffice to say, with the secret project finally done, I can resume work on my two armies for Flames of War.

My current To-Do list. Mostly German stuff,
with the green trucks being British lorries.

But what is this secret project that I've been working on you might be asking? Well, this will be revealed in the upcoming days. Here is a teaser though.

Garcia settles in on my secret project.

Hope you've enjoyed this update, and stay tuned for more. Sooner than later =)

Friday, 6 October 2017

British Rifles in Arnhem

British Rifle/MG Platoons

Today's update is focused on the just completed platoons of British Rifle/MG Platoons from Plastic Soldier Company. Each Platoon consists of six stands of infantry, one each of a PIAT team, light mortar team, and SMG command team, for a total of nine stands per platoon. There are exactly thirty-four infantry models across all the bases, with two platoons in total complete. The PSC box comes with enough models to make 3 full platoons and company head quarters.

PSC 15mm WW2 Late War British Infantry

While good value for money, and being all plastic, this box is excellent for starting an infantry platoon. Unfortunately the box doesn't come with bases, so you will have to source them separately. The sculpts are acceptable, with little in the way of mold lines, and everything is a single piece except for the PIAT teams, two inch mortars teams and Bren gun teams being two piece per model.

First platoon spread out against a rickety old fence. Bren light machine guns ready to fire.

British Infantry typically were armed with the bolt action Rifle No.4, a more easily produced version of the previous Lee-Enfield, still firing the powerful .303-inch round. Peppered through out the platoon were Bren light machine guns, a licensed version of the Czech ZGB 33. The Bren LMG was a reliable workhorse for infantry companies, and soldiers were clamoring to get their hands on more of them. It used the same ammunition as the Rifle No.4, with an RPM between 480 and 540.

More infantry in the field next door. 

Besides Bren LMG, British infantry platoons also were equipped with Projector, Infantry, Anti-Tank (PIAT) Mk1. Designed in 1942, these anti-tank weapons were quite similar to light mortars in function, but shot with support from the shoulder. These PIATs were generally disliked by the commonwealth troops due to it's inaccuracy and unreliable ammo, and also at just how heavy and bulky it was. However, it was a cheap weapon to produce, and it was excellent for ambushing roles since it didn't have much muzzle blast when fired.

Second infantry platoon, on the far left field. The PIAT on the left, ready to fire.
In the center is the command team, which looks like a lieutenant is a part of.

The NCO here are sporting the Sten gun, a cheap and simple sub-machine gun developed by the British during the Battle of Britain. While the British were buying up everything they could from the US, it simply wasn't enough to replace all the guns lost during the evacuation at Dunkirk. So the British designed and developed the Sten to complement the numbers of the Thompson SMG bought from across the pond. The Sten shares design features with the Lanchester SMG, which is a design copy of the German MP28 SMG. It uses 19mm rounds and typically had a 32 round capacity magazine. It was described as being highly inaccurate and unreliable, but was easy and cheap to produce, costing 15 shillings during the war.

Light two inch mortar team in the back ready to fire over the heads of a Bren gun team.

The two inch mortar was a regular with British infantry. The mortar typically shot a HE round and a Smoke round to a range of about 500 yards. The barrel originally had a sight on it, but was soon dropped as it was unnecessary for front line duty. Instead they had a single white line along the barrel and soldiers simply would line it up and fire. With enough practice, soldiers could accurately hit their targets with this simple system.

Close up of the Bren guns. The box only comes with one type of
model for the Bren gun, so duplication is noticeable here.

Panorama shot from behind.
The markings on the bases is to denote which platoons they all belong to.

The paints I used for this are in the picture below. I started with basing the stands with fine dirt, and then undercoating them in Plastic Soldier Army Spray British Khaki. I followed this with Vallejo Model Colour Khaki on the webbing and belts and various pouches, leaving some untouched for variety. Next was the skin, which is Vallejo Model Colour Flat Flesh, and this was the face and hands. The face has a chin strap, so I would come back to this after most of the other colours were done in the clean up phase.


Once the flesh was complete, I decided to paint the base Army Painter Dirt Splatter, and once dry, a light dry-brush of the Vallejo Model Colour Flat Flesh. Then carefully paint the boots with Vallejo Model Colour Black Grey. The weapons are painted Vallejo Model Colour Beige Brown for wood and Vallejo Model Colour Gunmetal Grey. To finish it all off, a quick picking out of the camo leaves on the helmets with Vallejo Model Colour Reflective Green, and a whole model wash of Army Painter Soft Tone, the stuff of champions. 

Another closeup of the infantry.

The final touches is some Army Painter Field Grass in patches, to simulate French/Holland countryside.

Ready to go to war to kick some jerry arse!

Hope you've enjoyed this update, and stay tuned for more.

Sunday, 1 October 2017

Ploughed Field 3/3


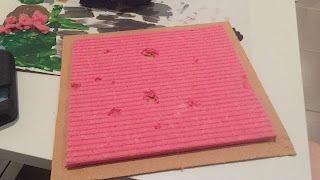
For my third and final ploughed field, I decided to try my hand at a bombed field. Following the same steps as the first two, I glued the sponge to the base and began to cut up bits of the sponge. Using the spak filler, I filled the holes and smoothed them out to look like impact craters. It was a little fiddly to do, and took a few days of touching up and leaving to dry.


Next, I added the base coat of paint. Testing to see how the craters would look, I soon realised I needed to lighten to tone of the entire field, mixing much White to the Burnt Umber. Once it dried, I noticed that some of the filler peeled or broke as the sponge was soft and shifted its form as I painted. It, too, took a few days of adding numerous coats.


Following the same steps as my first field, I began to cut up and glue my fences together. This time, I decided to try something different and make a telephone pole as well. For this, I used a kebab skewer, cut it to size, smoothed it and glued on some 'arms'. Once dried, I hot glued the fences to the base, making sure to make some of them look damaged or destroyed by the Artillery, then began to paint them. Once again, I used a base coat of Burnt Umber followed by a mix of Raw Sienna for a second, lighter coat. Then I added the White and gave them a drybrush to highlight them a bit more. Once I finished that, I added the watered down PVA glue to the base and added the Grass Tufts and the Flock.


M-10 3-Inch Gun

 Having had another battle recently, I was again, put in the mood to paint something. This time, I decided on something quick and easy. I we...